

Armed with a modified 3D printer, PC builder Jean Roberto De lacovo created all of the components he wanted to make the chassis for this beautiful 3D printed PC case. It’s known as Piñasphere, and it incorporates a liquid-cooled 8-core AMD Ryzen 7 APU.
Due to our quickly rising PC constructing Fb web page, we’ve seen many customized gaming PCs, from mods based mostly on present case designs to scratch builds. You possibly can even submit yours for consideration proper right here. For now although, let’s learn the way Jean made this beautiful 3D-printed PC case.
: What impressed you to construct this PC?
Jean: I needed to see how far I may get with the design of a pc case. The usual that individuals image of their thoughts whenever you discuss a PC is a boxy form – aside from only a few exceptions, most pc instances are based mostly on a sq. form.
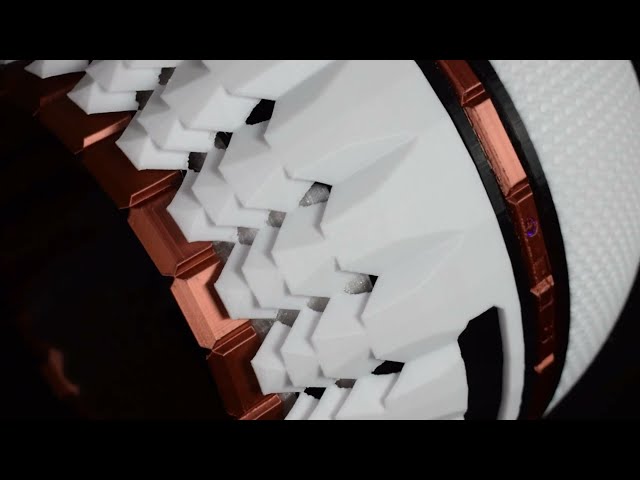
On the edges you may see these black wavy rings – I needed them to appear to be the waves generated whenever you drop one thing in water. I used to be already enjoying with the pinecone/pineapple motif for the dome right now, so I believed this concept would work rather well for the wave crests too, albeit with plenty of tweaking.
The opposite half of the dome was additionally nature-inspired – it’s based mostly on crammed honeycombs, and each hexagon is complicated whenever you view it up shut. This complexity additionally helps in terms of making the printing layer strains much less seen. The inside has extra of a sci-fi look with plenty of polygons. It’s structurally just like an plane body – it’s not a sphere, however a posh icosphere with geometric holes that assist with airflow too.
How did you propose and design this construct?
Often I begin my work with some fast pencil and paper sketches, however this one began with a Tinkercad sketch. I used to be testing varied configurations with some 3D mock-ups I made from the {hardware} parts on Tinkercad, then I believed that if I didn’t set up a GPU, and used an exterior PSU, I may attempt to make a split-sphere form.
The primary concept was to make use of a handcrafted metallic body made with 3mm-thick aluminum sheet. Nevertheless, I’d additionally just lately executed some experiments with 3D printing to make a digicam rig – throughout these experiments I examined the power of PLA and PETG, and concluded that PETG was sturdy sufficient to deal with the stresses of the case.
You used 3D printing for the entire construct – inform us all about your course of.
At first it was onerous, however it will now be a a lot faster course of, I needed to begin planning it in another way from a ordinary case mod, as a result of I wasn’t eradicating materials however including it. I did some assessments with totally different small initiatives so I may fine-tune the 3D printer settings.
The software program I used as a slicer for the prints was Ultimaker Cura 4.13, I discovered it intuitive from the beginning and it allowed me to fine-tune my prints. For instance, I realized to set the Z-seam alignment to keep away from having a visual line on the prints, and to set the retraction settings for various conditions – you may mainly tailor the settings round your wants.
My workhorse 3D printer is a Creality Ender 3 Professional, which I’ve modded because it was too noisy for me. I’ve added a Creality Silent Mainboard, plus a 120mm fan for the PSU, and I additionally designed and printed the customized fan ducts for the printer with PETG, which permits me to make use of a twin 60mm Noctua fan setup as a substitute of the usual 40mm followers.
It additionally has a direct extruder now – I needed to scale back the retraction much more than anticipated, as a result of the primary prints with the brand new setup resulted in extruder clogging issues when printing with PETG.
In complete, Piñasphere consists of 27 3D-printed components. For the ending touches I used precision cutters, together with a lighter, to take away any extra materials or stringing. Nevertheless, as soon as I’d acquired the filament temperatures proper I discovered that stringing was extraordinarily restricted.

I additionally discovered that the orientation of components through the printing course of helped when it got here to ending. I purposely select the bottom because the contact facet between components, because it’s the facet with which you’ve gotten much less management for the end when you don’t paint it afterwards.
One key level I realized is that getting the components completely clear with precision cutters takes time and persistence – make one mistake and you find yourself throwing away the printed half – it occurred with an SSD body I printed. The cleansing and leveling of the printer takes a little bit of time too, however it solves the vast majority of issues that may happen through the printing course of – printing at a slower velocity additionally helps keep away from plenty of issues.
How do all of the items match collectively?
It’s mainly a super-sandwich construction – as with plane, some components are merely pressed between the fixed layers. The components are formed to allow them to solely be assembled the right manner – even when it’s only a totally different nook or gap, every half all the time has a side that helps for positioning. This construction enabled me to create a chassis with sufficient power, however with minimal infill, so it minimizes the load and the quantity of fabric used.
I then used stainless-steel screws for fastening – the motherboard is secured utilizing M3 screws with 10mm threaded brass inserts – you may heat them up with a soldering iron then press them contained in the 3D-printed components. For the remainder of the fastenings, I threaded the PETG with instruments and used button-head M5 screws – the threaded sections are at the least 10mm lengthy.
In the meantime, the white domes merely snap into place on the motherboard facet, and safe with a slight clockwise twist on the radiator facet – no instruments are wanted right here.

What tiny motherboard is that?
I used an ASRock X300M-STX motherboard. It was one of many smallest motherboards I may discover that allowed me to make use of an AMD Ryzen 7 5700G. It could help as much as 64GB of reminiscence, and it has two M.2 SSD slots and two SATA ports for two.5in SSDs, so it provides me ample room to improve reminiscence and storage, which is able to assist hold this machine helpful sooner or later, possibly as an workplace PC or server.
What challenges did the form of the construct current?
Actually, when you assume principally in regards to the form and never the size, it’s comparatively straightforward to make a PC with an uncommon form – the most important problem for me was leaving sufficient room contained in the case for all of the gear to work properly.
One other large problem was introduced by the 2 I/O panels – I’d determined that each of them had been going to appear to be the entrance panel, positioned in a recess of the dome, however I additionally needed to depart some house for the ability wire, and that’s the reason the ‘slice’ is so lengthy on that facet.
What PSU did you employ?
It’s the exterior energy provide that ships with the ASRock Deskmini X300. It seems like a laptop computer energy provide, and its output is 120W at 19V – it’s moderately small, so it was good for this PC, because it isn’t a power-hungry monster.
How did you propose the cable routing?
All of the cables are routed inside the center ring, which additionally kinds the primary body – it has plenty of empty areas in it for airflow and cable routing. The cables for the ability swap, SSD exercise LED, and energy LED are tucked beneath the motherboard, and so they then go into the field that acts as hooks for the domes and likewise comprises the ability swap.
The radiator fan cable is hidden by the dome hook beneath the radiator – I made a routing canal for it – then it goes by way of the passage for one of many cooling tubes and stays hidden beneath the cooling tube on the motherboard facet. The Wi-Fi antennae cables are hidden beneath the motherboard, and their connectors on the highest of the motherboard are hidden beneath the M.2 SSD so that you simply can’t see them. Lastly, the waterblock cables had been laid beneath the waterblock’s fastening ‘wings’.

Inform us how the airflow system works.
This is likely one of the components I like essentially the most in my initiatives. After going by way of the radiator, the air goes by way of the center channel, cooling the two.5in SSD, then strikes beneath the motherboard and exits from a 5mm hole between the motherboard and its help body – it flows round virtually the entire perimeter.
However the air isn’t out at this level – the inner dome then guides it to maneuver across the motherboard, so it cools the M.2 modules and motherboard VRM heatsink. There are additionally two holes on the facet of the radiator, which relieve a little bit of the counter strain generated from the air shifting inside the center channel.
How did you obtain the copper-colored touches?
I needed so as to add a heat colour to distinction in opposition to the white, and I initially thought-about utilizing actual copper rings. Nevertheless, through the sketching part I needed so as to add extra reflective sides than you get on rings, so I printed them with a extra complicated form.
If I’d had a tonne of time I may have handcrafted them, however this time I needed to check myself and see what I may do with simply 3D printing, so I purchased some Giantarm Silk Copper Filament and the outcomes didn’t disappoint – they do give a premium vibe to the construct.
What spec did you select and why?
I needed it to have the ability to do a little bit of all the things, however 3D enhancing was vital functionality. I additionally needed the machine to carry out decently at 1080p gaming. With no room for a graphics card, the plain alternative was going for the very best APU I may purchase, and that was the AMD Ryzen 7 5700G – I like it; it’s a superb performer.
The construct has 16GB of reminiscence, as a result of I used to be searching for the {hardware} throughout October and November, and it was on sale then. Corsair is an efficient model, so I took my probability and purchased it.
I’ll improve the RAM within the subsequent few months, because the ASRock motherboard permits you to improve the shared video RAM as much as 16GB in case you have greater than 32GB of system reminiscence.
Did you come throughout any difficulties?
I feel the most important problem was fine-tuning the printer profile for each filament. I needed to scale back the printing errors that will be not possible to cover, as one in all my targets was to make the construct look good with out having to color it.
I acquired used to deep-cleaning the extruder, and I additionally purchased a protracted stainless-steel needle to purge each little bit of filament residue out of it.
How lengthy did it take you to finish this construct, from begin to end?
After the training about 3D enhancing part, I’d say 3-4 months. It might undoubtedly take much less time if I did it now.
Are you fully pleased with the top end result, or do you would like you’d executed a few of it in another way on reflection?
I’m completely joyful – this was the primary time I’d tried constructing a 3D-printed case, and earlier than the ultimate meeting I wasn’t 100% positive how it will look. Nevertheless, after I assembled all of it collectively I had just one thought – ‘Wow, it’s strong and appears actually cool!’ I actually couldn’t be happier.

Pinasphere 3D-printed PC specs
- CPU: AMD Ryzen 7 5700G
- GPU: Built-in AMD Radeon RX Vega11
- Storage: 1TB Samsung 980 M.2 SSD, 250GB Samsung 860 Evo 2.5in SATA SSD
- Reminiscence: 16GB (2 x 8GB) Corsair Vengeance 3200MHz DDR4 SODIMMs
- Motherboard: ASRock X300 M-STX
- PSU: 120W ASRock exterior PSU
- Cooling: Cooler Grasp MasterLiquid ML120L V2 AIO liquid cooler
Superb work, Jean. This can be a really one-of-a-kind customized PC – the design is excellent, and also you’ve additionally proven that you simply actually could make a rattling handsome 3D-printed PC case as properly.
This publish initially appeared on Customized PC, which has been masking wonderful setups for over 20 years and is now a part of . Be part of our 500k member Fb group to debate this construct.
If you think about your self to be an knowledgeable PC builder, you may submit your personal customized PC construct to us at the moment for an opportunity of being featured on sooner or later.